elasticsearch: configuring security
One of the most important points when implementing an Elasticsearch cluster is the security-related settings, both the user authentication and the way nodes communicate with each other and with clients.
For a long time authentication in Elasticsearch was not native, it was necessary to use a paid plugin from Elastic itself, the old x-pack, a third-party plugin such as Search Guard, or implement a proxy with basic authentication to receive the requests and forward them to the Elasticsearch cluster.
Exposing a cluster to the internet without authentication is extremely risky and it will be only a matter of time before any data leakage or data loss occurs.
Since versions 6.8 and 7.1 Elastic now includes the possibility to enable basic authentication natively and free of charge with the Basic license and from version 8.0 security features are enabled by default.
Security Layers
Elastic basically defines 3 security layers that can be applied in a cluster.
minimal
Only user authentication is enabled, only works for clusters that are single-node, not recommended for production.
basic security
In addition to user authentication, communication between nodes (transport) is encrypted using TLS, it can be used in production, but client requests to Elasticsearch use http and therefore are not encrypted.
basic security + https
It also uses TLS for requests made by clients, it is the recommended configuration for production.
Configuring Security
Version 8 makes the process of deploying an Elasticsearch cluster with security enabled a lot easier, but in some scenarios you may need to manually configure security parameters.
In this example we will manually configure security on a cluster of 3 Elasticsearch nodes and 1 Kibana.
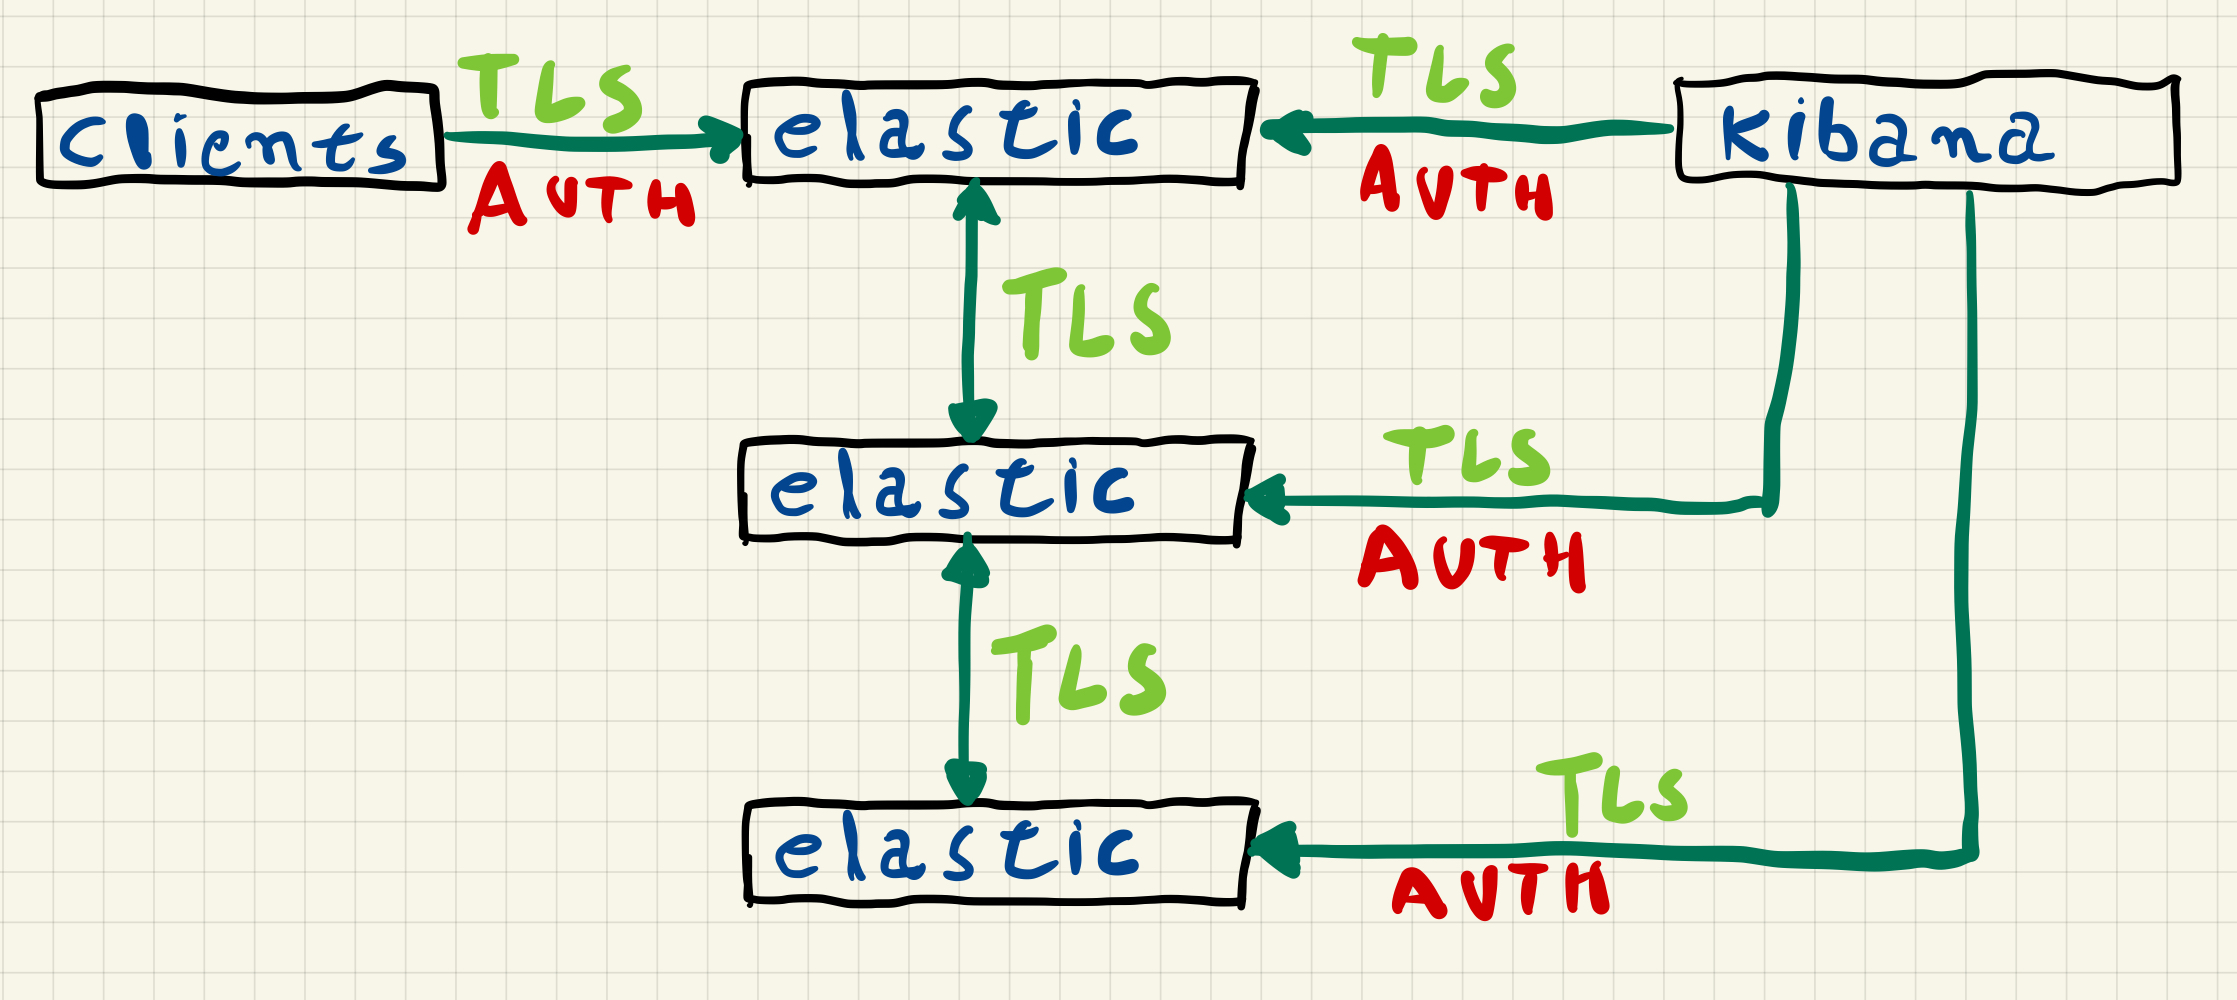
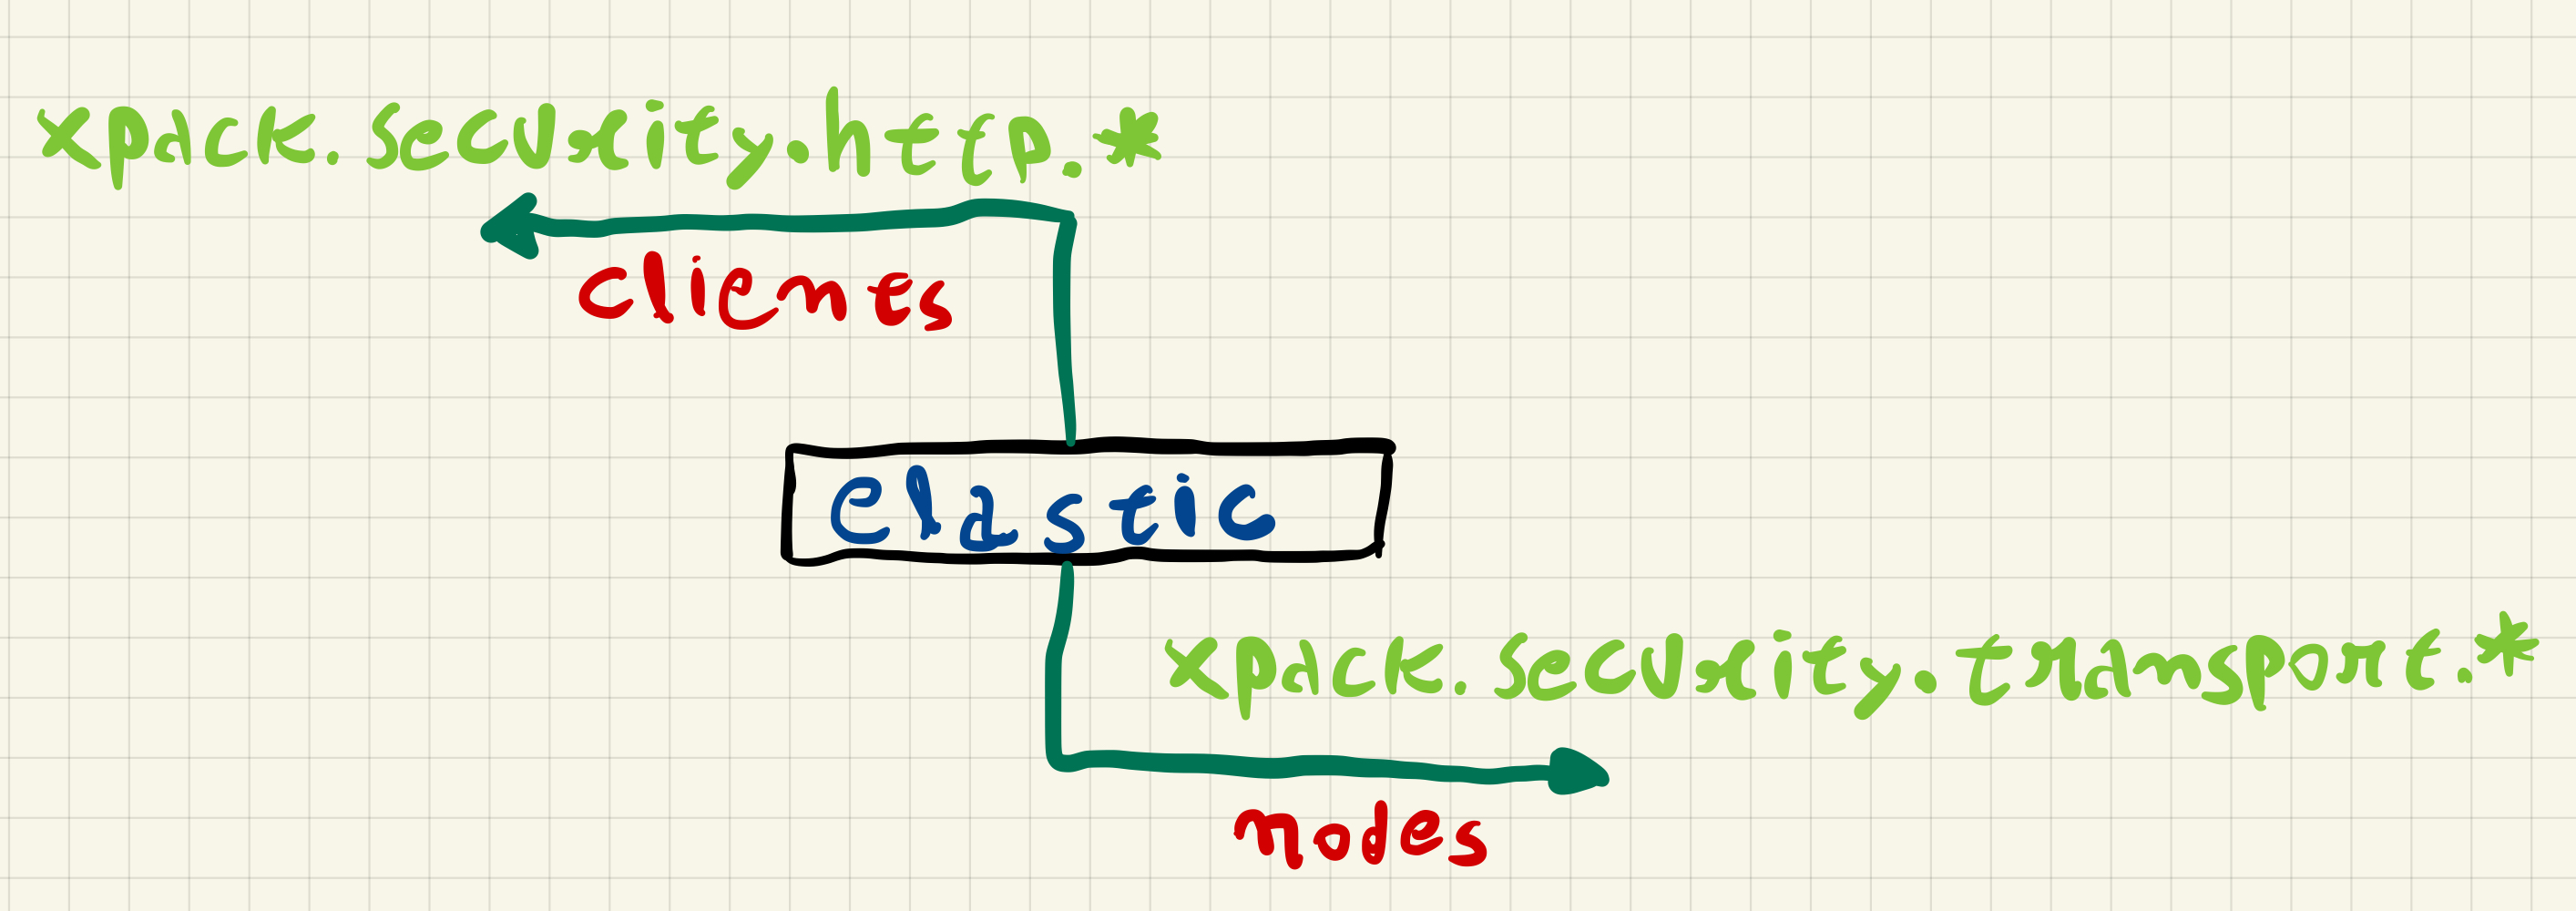
In this configuration the Elasticsearch nodes communicate with each other using TLS, this communication between the nodes uses a protocol called transport and security is enabled through the xpack.security.transport.ssl.* settings, the communication of clients with any cluster node uses REST requests via HTTPS, security in communication with clients is enabled through the xpack.security.http.ssl.* settings.
To make this communication possible, we need to create a certificate authority to generate a certificate for each node.
Installing Elasticsearch
In this example we will use servers with Rocky Linux 8 and install Elasticsearch from the rpm package, without adding the repository.
$ wget https://artifacts.elastic.co/downloads/elasticsearch/elasticsearch-8.4.3-x86_64.rpm
$ sudo rpm -ivh elasticsearch-8.4.3-x86_64.rpm
During the installation process, certificates for the node and the elasticsearch.keystore file are created, since we want to perform a manual configuration, we will remove those certificates and the elasticsearch.keystore file.
$ sudo rm -rf /etc/elasticsearch/certs
$ sudo rm -f /etc/elasticsearch/elasticsearch.keystore
Bootstrap Checks
When starting up Elasticsearch will make some checks to see if the process can allocate enough memory, to avoid any issues when we start the service, we need to change the file /etc/security/limits.conf and also add an extra configuration on the systemd service.
We need to add the following lines in /etc/security/limits.conf.
elasticsearch soft memlock unlimited
elasticsearch hard memlock unlimited
We also need to create the following path /etc/systemd/system/elasticsearch.service.d.
$ sudo mkdir /etc/systemd/system/elasticsearch.service.d
Then we need to add the following lines into the file /etc/systemd/system/elasticsearch.service.d/override.conf.
[Service]
LimitMEMLOCK=infinity
Since we changed a systemd service, we need to performa a daemon-reload.
$ sudo systemctl daemon-reload
Creating a Certificate Authority (CA)
After installing Elasticsearch, we now need to create a certificate authority to generate the certificates for each node, for that we will use the elasticsearch-certutil command in ca mode on one of the nodes.
$ sudo /usr/share/elasticsearch/bin/elasticsearch-certutil ca --pem -pass
This command will generate a .zip file containing both the private key and the certificate, you will be asked for a password for the private key and the name of the zip file.
This tool assists you in the generation of X.509 certificates and certificate
signing requests for use with SSL/TLS in the Elastic stack.

The 'ca' mode generates a new 'certificate authority'
This will create a new X.509 certificate and private key that can be used
to sign certificate when running in 'cert' mode.

Use the 'ca-dn' option if you wish to configure the 'distinguished name'
of the certificate authority

By default the 'ca' mode produces a single PKCS#12 output file which holds:
    * The CA certificate
    * The CA's private key

If you elect to generate PEM format certificates (the -pem option), then the output will
be a zip file containing individual files for the CA certificate and private key

Enter password for CA Private key :
Please enter the desired output file [elastic-stack-ca.zip]:
The file elastic-stack-ca.zip will be created in the path /usr/share/elasticsearch and we need to copy it to /etc/elasticsearch/certs.
$ sudo mkdir /etc/elasticsearch/certs
$ sudo cp /usr/share/elasticsearch/elastic-stack-ca.zip /etc/elasticsearch/certs
$ sudo unzip /etc/elasticsearch/certs/elastic-stack-ca.zip -d /etc/elasticsearch/certs/
After unzipping elastic-stack-ca.zip we will have the files ca.crt and ca.key
/etc/elasticsearch
└── certs
    └── ca
        ├── ca.crt
        └── ca.key
Creating the nodes certificates
We can create one certificate for transport communications and a different certificate for https communications, but in this example we will only create one certificate per node.
To create the certificates we will again use the elasticsearch-certutil command, but now in the cert mode.
$ sudo /usr/share/elasticsearch/bin/elasticsearch-certutil cert --silent --pem \
    --ca-key /etc/elasticsearch/certs/ca/ca.key \
    --ca-cert /etc/elasticsearch/certs/ca/ca.crt --ca-pass CA-KEY-PASSWORD \
    --in /tmp/instances.yml --out nodes.zip --pass CERT-PASSPHRASE
The arguments are:
--silent: minimal output--pem: create certificates in PEM format with.crtand.keyfiles--ca-key: path to the CA private key--ca-cert: paht to the CA certificate--ca-pass: password for the CA private key--in: an.ymlfile with the host name, ip address and dns entries of each node--out: name for the output zip file with the nodes certificates--pass: passphrase to use in the nodes certificates
Before running the command we need to create the instances.yml file in the following format:
instances:
  - name: "node-name"
    ip: ["ip"]
    dns: ["node-name", "node-name.domain.name]
In this file we need to set the host name, and all the IP addresses and DNS entries of the node.
The instances.yml that we will use in our example is the following.
instances:
  - name: "es01"
    ip: ["10.0.0.101"]
    dns: ["es01", "es01.lab", "es01.lab.local"]
  - name: "es02"
    ip: ["10.0.0.102"]
    dns: ["es02", "es02.lab", "es02.lab.local"]
  - name: "es03"
    ip: ["10.0.0.103"]
    dns: ["es03", "es03.lab", "es03.lab.local"]
After running the command, the file nodes.zip will be created in the path /usr/share/elasticsearch, we will copy it to the path /etc/elasticsearsh/certs.
$ sudo cp /usr/share/elasticsearch/nodes.zip /etc/elasticsearch/certs/
$ sudo unzip /etc/elasticsearch/certs/nodes.zip -d /etc/elasticsearch/certs/
A directory for each node will be created containing the .crt and .key files for the node.
Archive:  /etc/elasticsearch/certs/nodes.zip
   creating: /etc/elasticsearch/certs/es01/
  inflating: /etc/elasticsearch/certs/es01/es01.crt
  inflating: /etc/elasticsearch/certs/es01/es01.key
   creating: /etc/elasticsearch/certs/es02/
  inflating: /etc/elasticsearch/certs/es02/es02.crt
  inflating: /etc/elasticsearch/certs/es02/es02.key
   creating: /etc/elasticsearch/certs/es03/
  inflating: /etc/elasticsearch/certs/es03/es03.crt
  inflating: /etc/elasticsearch/certs/es03/es03.key
We need now to copy the content of the path /etc/elasticsearch/certs in this node to the other two nodes that will be part of our cluster.
Configuring security and starting the cluster
Before starting the cluster nodes, we need to configure the security options in the elasticsearch.yml file on each node, create the elasticsearch.keystore file and add the key passphrase for each node.
To create the elasticsearch.keystore file we use the following command on each of the nodes.
$ sudo /usr/share/elasticsearch/bin/elasticsearch-keystore create
$ sudo sh -c 'echo "passphrase" | /usr/share/elasticsearch/bin/elasticsearch-keystore add --stdin xpack.security.transport.ssl.secure_key_passphrase -f'
$ sudo sh -c 'echo "passphrase" | /usr/share/elasticsearch/bin/elasticsearch-keystore add --stdin xpack.security.http.ssl.secure_key_passphrase -f'
$ sudo chmod 0660 /etc/elasticsearch/elasticsearch.keystore
With the keystore created and configured, we will use the following elasticsearch.yml file on each node, changing the specific values for the node.
As an example, for node es01 we have the following configuration.
# es01
#
path.data: /var/lib/elasticsearch
path.logs: /var/log/elasticsearch
bootstrap.memory_lock: true

cluster.name: es
node.name: es01

network.host: ['10.0.0.101']
http.port: 9200

cluster.initial_master_nodes: ['es01', 'es02', 'es03']
discovery.seed_hosts: ['es01', 'es02', 'es03']

# security settings
xpack.security.enabled: true
xpack.security.autoconfiguration.enabled: false
# transport ssl
xpack.security.transport.ssl.enabled: true
xpack.security.transport.ssl.key: certs/es01/es01.key
xpack.security.transport.ssl.certificate: certs/es01/es01.crt
xpack.security.transport.ssl.certificate_authorities: certs/ca/ca.crt
## http ssl
xpack.security.http.ssl.enabled: true
xpack.security.http.ssl.key: certs/es01/es01.key
xpack.security.http.ssl.certificate: certs/es01/es01.crt
xpack.security.http.ssl.certificate_authorities: certs/ca/ca.crt
After changing the elasticsearch.yml in the 3 nodes, we can start them.
$ sudo systemctl start elasticsearch
Creating a password for the system users
With the cluster up we now need a user to authenticate ourselves, so we will reset the password of the elastic system user.
$ sudo /usr/share/elasticsearch/bin/elasticsearch-reset-password --url "https://es01:9200" -u elastic
This command will connect to Elasticsearch on node es01 and reset the password for the elastic user to a random value that will be displayed on the screen, if you want to choose a password just use the -i parameter at the end of the command.
With the username and password we will validate the cluster status using curl, but since we are using a local CA we will need to pass the -k parameter or point to the CA certificate.
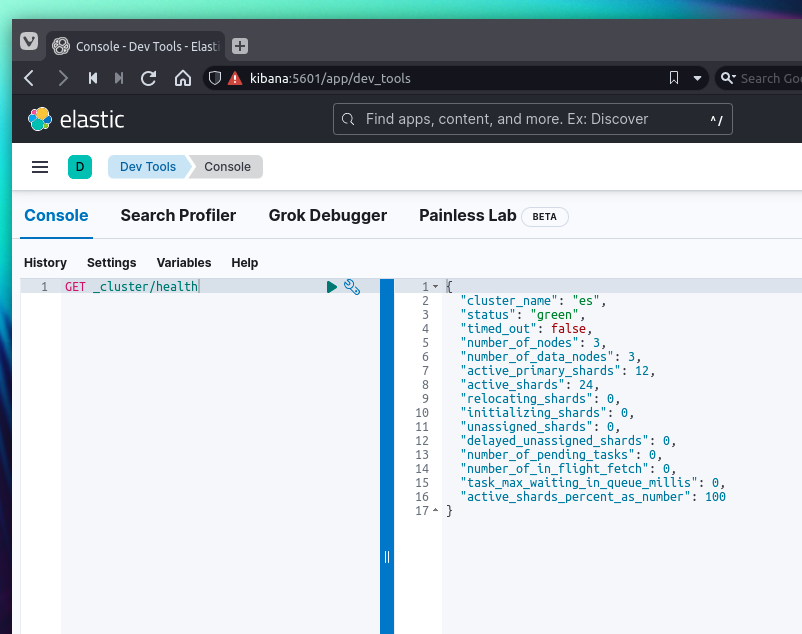
$ sudo curl -XGET https://es01:9200/_cluster/health?pretty -u elastic:PASSWORD -k
or
$ sudo curl -XGET https://es01:9200/_cluster/health?pretty -u elastic:PASSWORD --cacert /etc/elasticsearch/certs/ca/ca.crt
RESPONSE
{
  "cluster_name" : "es",
  "status" : "green",
  "timed_out" : false,
  "number_of_nodes" : 3,
  "number_of_data_nodes" : 3,
  "active_primary_shards" : 2,
  "active_shards" : 4,
  "relocating_shards" : 0,
  "initializing_shards" : 0,
  "unassigned_shards" : 0,
  "delayed_unassigned_shards" : 0,
  "number_of_pending_tasks" : 0,
  "number_of_in_flight_fetch" : 0,
  "task_max_waiting_in_queue_millis" : 0,
  "active_shards_percent_as_number" : 100.0
}
Installing Kibana
For Kibana we will use just one server, also with Rocky Linux 8.
$ wget https://artifacts.elastic.co/downloads/kibana/kibana-8.4.3-x86_64.rpm
$ sudo rpm -ivh kibana-8.4.3-x86_64.rpm
Creating Kibana Certificate
The certificate for Kibana can be created in the same way as node certificates, just changing the instance.yml file.
instances:
  - name: "kibana"
    ip: ["10.0.0.104"]
    dns: ["kibana", "kibana.lab", "kibana.lab.local"]
$ sudo /usr/share/elasticsearch/bin/elasticsearch-certutil cert --silent --pem \
    --ca-key /etc/elasticsearch/certs/ca/ca.key \
    --ca-cert /etc/elasticsearch/certs/ca/ca.crt --ca-pass CA-KEY-PASSWORD \
    --in /tmp/instances.yml --out kibana.zip --pass CERT-PASSPHRASE
In Kibana we have two TLS configurations, the communication with Elasticsearch, where Kibana behaves like any other client, and the communication with the user through the browser, as in the case of the transport and https configurations of the Elasticsearch nodes, we can also use different certificates if we want.
Configuring Security in Kibana
In version 8 it is no longer possible to use the elastic superuser in the Kibana configuration, we must use the kibana_system user or use a service account.
To use the kibana_system account you will need to reset password in the same way as for the elastic user.
In this example we will create a service account for communication between Kibana and Elasticsearch.
$ curl -X POST "https://es01:9200/_security/service/elastic/kibana/credential/token/kibanatoken?pretty" -u elastic:PASSWORD -k
RESPONSE
{
  "created" : true,
  "token" : {
    "name" : "kibanatoken",
    "value" : "token"
  }
}
We will add the certificate token and passphrase to the Kibana keystore, which is automatically created during installation.
$ sudo sh -c 'echo "passphrase" | /usr/share/kibana/bin/kibana-keystore add elasticsearch.ssl.keyPassphrase --stdin'
$ sudo sh -c 'echo "passphrase" | /usr/share/kibana/bin/kibana-keystore add server.ssl.keyPassphrase --stdin'
$ sudo sh -c 'echo "token" | /usr/share/kibana/bin/kibana-keystore add elasticsearch.serviceAccountToken --stdin'
Before editing the kibana.yml file, we need to copy the CA certificate and Kibana certificates to the Kibana server, for that we need to create the path /etc/kibana/certs.
kibana.yml
server.port: 5601
server.host: "10.0.0.104"
server.publicBaseUrl: "https://kibana:5601"
server.maxPayload: 5048576
server.name: "kibana"

# elasticsearch
elasticsearch.hosts: ["https://es01:9200", "https://es02:9200", "https://es03:9200"]

elasticsearch.ssl.certificate: /etc/kibana/certs/kibana/kibana.crt
elasticsearch.ssl.key: /etc/kibana/certs/kibana/kibana.key
elasticsearch.ssl.certificateAuthorities: [ "/etc/kibana/certs/ca/ca.crt" ]

# server https
server.ssl.enabled: true
server.ssl.certificate: /etc/kibana/certs/kibana/kibana.crt
server.ssl.key: /etc/kibana/certs/kibana/kibana.key
server.ssl.certificateAuthorities: [ "/etc/kibana/certs/ca/ca.crt" ]
To start Kibana we use systemctl.
$ sudo systemctl start kibana
After starting Kibana we can access the server via browser to validate that the connection is using TLS, an alert will be shown that the connection is not private as the browser does not know the local CA that we used to generate the Kibana certificate, if necessary this can be resolved by importing the local CA into the browser used.
More information
More information on configuring Security in Elasticsearch and other forms of authentication available depending on the license in use can be found in official documentation.